Cornhole is a classic backyard game that never goes out of style. The sound of bean bags landing on wooden boards is a quintessential part of summer gatherings and family reunions. If you’re looking to take your outdoor game experience to the next level, why not create your own DIY Cornhole boards?
In this comprehensive guide, we’ll walk you through the process of Cornhole board construction, step by step, and share tips on making custom Cornhole boards that reflect your style and personality.
Materials and Tools
Before we dive into the nitty-gritty of building your Cornhole boards, let’s gather the materials and tools you’ll need. Here’s a checklist:
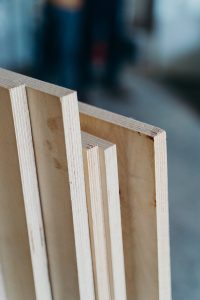
- Birch plywood sheets
- Screws
- Paint and painter’s tape for customization
- Bean bags
- Measuring tape
- Jigsaw
- Drill
- Hole saw
- Wood glue
- Wood filler
- Pocket hole screws
- Carriage bolts and lock nuts
- Sandpaper
- Clamps
- Screwdriver
Now that you have everything ready, let’s start crafting your own DIY Cornhole boards.
Step 1: Cutting the Plywood
Begin by marking and cutting the birch plywood into two 2′ x 4′ boards, which are the regulation size for Cornhole boards. A circular saw or jigsaw will work well for this task. Make sure to measure accurately and cut precisely to achieve a professional look.
Step 2: Building the Frame
To construct the frame, you’ll need four frame boards. Each should be 48 inches long. Position them along the edges of the plywood, ensuring that the top edge of the frame aligns with the top edge of the plywood. Attach them using screws. These frame boards are essential for the structural integrity of your Cornhole boards.
Step 3: Cutting the Hole
Mark the center point of each board and use a hole saw to cut a 6-inch diameter hole at this location. This is where the bean bags will be tossed during the game, so accuracy is crucial.
Step 4: Making Pocket Holes
To connect the frame boards to the plywood, create pocket holes using a pocket hole jig. This method ensures a secure and hidden attachment for a polished look.
Step 5: Sanding and Smoothing
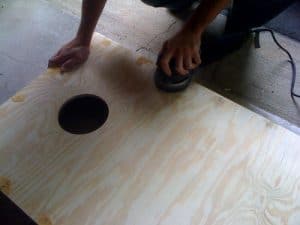
Sand the entire playing surface, including the edges and the hole, to make it smooth and free of splinters. This step is vital for creating a comfortable and professional playing experience.
Step 6: Customizing Your Boards
Now comes the fun part – customizing your Cornhole boards. Use painter’s tape to create crisp lines and shapes for your design. Whether you want to paint your boards with your favorite team’s colors, create a unique pattern, or add decals, this is your chance to make your boards stand out.
Step 7: Final Touches
After your paint has dried, apply a clear coat or varnish to protect your Cornhole boards from the elements and enhance their appearance. This step not only adds a layer of durability but also gives your boards a professional finish.
Bean Bags

A Cornhole game is incomplete without regulation cornhole bags. These should be filled with corn kernels or beans, sewn with quality materials, and meet regulation standards for weight and size.
Playing Cornhole
Now that your DIY Cornhole boards are ready, it’s time to play. Set the boards about 27 feet apart from each other and take turns tossing bean bags into the holes. The team with the most points wins!
Playing the Perfect Game: Mastering the Bean Bag Toss
Now that you’ve successfully crafted your own Cornhole boards and ensured that the hole is smooth and ready for action, let’s delve into the art of playing Cornhole. Playing Cornhole, also known as the bean bag toss, is not just about tossing a bag into a hole; it’s a game of precision, strategy, and good old-fashioned fun.
Mastering the Toss: Play Cornhole Like a Pro
When you play Cornhole, you’re not just throwing a bean bag; you’re aiming for a target. Here are some tips to help you improve your tossing skills and have a blast:
- Stance and Grip: Find a comfortable stance with one foot slightly in front of the other. Hold the bean bag with a relaxed grip, ensuring it’s not too tight or too loose.
- Eye on the Target: Focus on the hole and keep your eyes locked on the target throughout your throw. Visualize the bag going in.
- Weight Distribution: Shift your weight slightly onto your back foot. This will help with balance and control.
- Throwing Technique: Develop a consistent throwing motion. Some players use a spin, while others prefer a straight toss. Experiment and see what works best for you.
- Distance Control: Work on your distance control. Cornhole is played from a distance of 27 feet, and accuracy is essential.
- Aim for the Hole: It sounds obvious, but aim for the hole, not just the board. Remember that getting a bag in the hole is worth more points.
- Strategy: Consider your strategy. Some players aim to block their opponents by landing bags in front of the hole, making it harder to score.
- Scoring: Understand the scoring system. Bags that go in the hole are worth 3 points, while bags on the board are worth 1 point. Points cancel out for bags of opposing teams in the same hole.
Hole-Smooth Boards for Perfect Play
Your DIY Cornhole boards, with their smooth playing surface and precisely cut holes, provide the ideal canvas for a perfect game of Cornhole. The smoothness of the hole ensures that your bean bags glide effortlessly towards their target.
Screw Holes and Bolt Holes: Ensuring Stability
The stability of your Cornhole boards is essential for fair play. The screw holes, where the frame is attached to the plywood, and the bolt holes for the carriage bolts must be secure and free from any rough edges. This ensures that your boards won’t wobble during the game and that there are no unexpected bounces when bags hit the surface.
Drill Pilot Holes for Precise Attachments
When you were constructing your Cornhole boards, you might have noticed that drilling pilot holes for screws and carriage bolts made the assembly process smoother. This step ensures that the wood doesn’t split and that the screws and bolts go in straight, providing a sturdy and professional finish.
Final Thoughts: DIY Cornhole Boards
In this DIY Cornhole board construction guide, we’ve walked you through the process of creating your custom Cornhole boards. With the right materials and tools, precise measurements, and a bit of creativity, you can turn this fun weekend project into a source of outdoor entertainment for years to come.
Whether you’re a seasoned DIY enthusiast or just getting started, building your Cornhole boards is a satisfying endeavor that adds a personal touch to a classic game. Get ready to have hours of fun in your backyard with your newly crafted Cornhole set. Enjoy the game, and don’t forget to add those finishing touches to make it uniquely yours.
So, are you ready to dive into the world of DIY Cornhole board construction and elevate your outdoor gaming experience? Gather your materials, follow the steps, and get ready for a fantastic game of Cornhole on your very own custom boards.
Other suggested articles:
